


This is crochet without sewing, including the straps. Making this bag was fun for me as it is like playing with a puzzle... think of it as one of those puzzle where you have to draw an object continuously without lifting your pen, which in this case, how to crochet without having to constantly fasten off, and eliminate sewing.
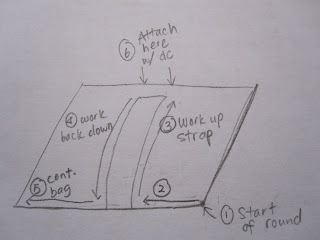
The bag is worked in rounds, and then the straps are worked up (on the final round of the bag), and then attached when worked to complete the bag.
The bag is worked in rounds, and then the straps are worked up (on the final round of the bag), and then attached when worked to complete the bag.
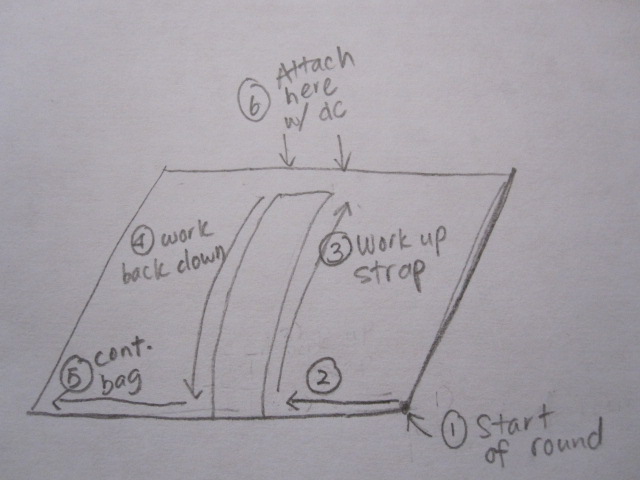
When working the straps, at first I tried dc, turn, dc, turn... but off course that leaves a very sloppy edge which definitely needs an extra sc or sl st on BOTH edge sides. Bear in mind, this like a puzzle, once you go up the straps, you gotta come back down to continuously work the bag without having to fasten off. Coming back down is a one way street. There's no way to work BOTH side of the strap edge without having to attach another yarn which yield to more weave in... UGH not to my liking!
So in the end, I came up with reverse sl st (rev sl st). This would ensure that the strap is being continuously worked on the RS, without having to turn the work. Now that the turning sticth is eliminated, I only have to worry about the left edge, which will be sl st that takes me back down to my bag. This would create a much nicer edging compare to the turning stitch edging.
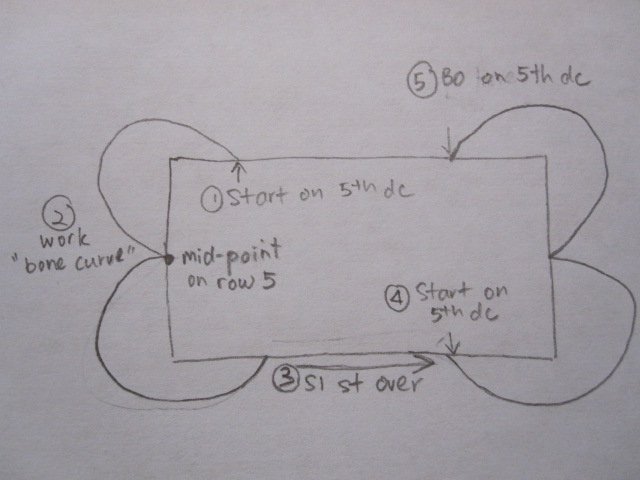
Once the bag is completed, the "bone curve" are worked in from top to side. Then sl st over to the other side to add the other set to "bone curve".

So in the end, I came up with reverse sl st (rev sl st). This would ensure that the strap is being continuously worked on the RS, without having to turn the work. Now that the turning sticth is eliminated, I only have to worry about the left edge, which will be sl st that takes me back down to my bag. This would create a much nicer edging compare to the turning stitch edging.
Once the bag is completed, the "bone curve" are worked in from top to side. Then sl st over to the other side to add the other set to "bone curve".
Finished measurement:
Width:6, Length: 5", Height: 4"
Hook: F (3.75 mm) and some stitch markers
Width:6, Length: 5", Height: 4"
Hook: F (3.75 mm) and some stitch markers
Yarn: Bernat Super Value in Yellow or any worsted 4-ply.
Stitches used:
Hdc – yo, insert hook into st, yo and pull up a lp, yo and pull through all 3 lps.
Rev sl st - insert hook on the previous stitch to the right, yo and pull through lp.
Ch-25
Bottom:
Rnd 1:
Rnd 1:
From the 3rd st from hook, dc in all ch. (24 sts). Turn
Rnd 2 - Rnd 9:
Ch-2 (count as 1 dc), dc from 2nd st and in all st, including top of ch-2. Turn. (24 sts).
Side: work in rounds from here on.
Rnd 1:
Work 20 sc evenly down the side post of dc (20 sts), sc in each st of chain base (24 sts), work 20 sc evenly up the side of post of dc (20 sts), sc in each st of dc (24 sts). Join with sl st to 1st sc. Total of 88 sts.
Note:
From here on, it'll help tremendously (when working the "bone curve") to put stitch marker as you work up the bag. I didn't use the st markers, and had to count each row, which slowed me down.
Each side of bag is 20 sts, and front of bag is 24 sts. Each round would start with side of bag, then front, then side and lastly front again, before joining to the beginning stitch. Therefore, put a marker on the 20th stitch, put a marker on the 24th st, put a marker on the 20th st.
Rnd 2: work in back loop for this round only
Ch-2 (count as 1 dc), from 2nd st, dc in all around in the back loop. Join with sl st to top of ch-2 (88 sts)
Rnd 3 - Rnd 9:
Ch-2, dc all around. (88 sts)
Rnd 10:
Ch-2, dc in the next 12 sts
Strap:
(Rev sl st in next 4 sts, ch-2, dc in next 3) 12x, sl st back down to the bag, at the back loop of dc post. Cont. to work dc round of bag.
Dc in next 8 (the 20th st for side of bag), dc in next 24 sts (front of bag), dc in next 8 sts
Joining of Strap:
Curve of Bone:
With front of bag (the 24 sts) facing you, from the top left corner, count backwards 5 dc, and start from there.
Rnd 1:
ch-1, hdc in next, dc in next 3 sts, 3 dc in corner, work 2 dc evenly on the side post of dc in Row 1 (where marker is) *Side note, work 2 dc in post of Row 2, work 1 dc in between row, work 2 dc in post of Row 3, work 1 dc in between row, work 1 hdc in post of Row 4, sc in post of Row 5. Ch-1. Turn.
*Side Note:
When you're working with the starting of row (when working the bag), the ch-2 will be easy to see, but when working the other 3 side edges, it won't be as easy to detect the "20th" or "24th" dc. That's when the marker comes in handy.
Rnd 2:
Hdc in next st, (dc in next st, 2 dc in next st) 4x, dc in next st, 3 dc in next st, dc in next st, 2 dc in next st, dc in next st, sk 1 st, sc in next st. Ch-1. Turn.
Rnd 3:
Sk 1 st, sc in next 19 sts, sl st in next 2 sts, sl st in post of Row 5, hdc in post of Row 6, work 2 dc in post of Row 7, work 1 dc in between row, work 2 dc in post on Row 8, work 1 dc in between row, work 2 dc in post of Row 9, 3 dc in next st, dc in next 3 sts, hdc in next st, sl st in next st, ch-2. Turn.
Rnd 4:
Sk 1 st, hdc in next st, dc in next st, 2 dc in next st, dc in next st, 3 dc in next st, dc in next st, (2 dc in next st, dc in next st) 3x, hdc in next st, sc in next st, sl st in next, ch-1. Turn.
Rnd 5:
Sk 1 st, sc 18, sl st in next 2 st, sl st to bag^. Sl st over to the other side until it's 5 dc away from the corner, and repeat Rnd 1 - Rnd 5 but stop at ^ and fasten off.
Repeat Curve of Bone for the other front side of the bag.
Side: work in rounds from here on.
Rnd 1:
Work 20 sc evenly down the side post of dc (20 sts), sc in each st of chain base (24 sts), work 20 sc evenly up the side of post of dc (20 sts), sc in each st of dc (24 sts). Join with sl st to 1st sc. Total of 88 sts.
Note:
From here on, it'll help tremendously (when working the "bone curve") to put stitch marker as you work up the bag. I didn't use the st markers, and had to count each row, which slowed me down.
Each side of bag is 20 sts, and front of bag is 24 sts. Each round would start with side of bag, then front, then side and lastly front again, before joining to the beginning stitch. Therefore, put a marker on the 20th stitch, put a marker on the 24th st, put a marker on the 20th st.
Rnd 2: work in back loop for this round only
Ch-2 (count as 1 dc), from 2nd st, dc in all around in the back loop. Join with sl st to top of ch-2 (88 sts)
Rnd 3 - Rnd 9:
Ch-2, dc all around. (88 sts)
Rnd 10:
Ch-2, dc in the next 12 sts
Strap:
(Rev sl st in next 4 sts, ch-2, dc in next 3) 12x, sl st back down to the bag, at the back loop of dc post. Cont. to work dc round of bag.
Dc in next 8 (the 20th st for side of bag), dc in next 24 sts (front of bag), dc in next 8 sts
Joining of Strap:
- Dc in next st, BUT before completing the dc, with the last 2 lps on hook, line up the strap, insert hook into corner of strap, yo and pull through all 3 lps.
- Dc in next st, before completing the dc, with the last 2 lps on hook, insert hook into 2nd st of strap, yo and pull through all 3 lps.
- Dc in next st, before completing the dc, with the last 2 lps on hook, insert hook into 3rd st of strap, yo and pull through all 3 lps.
- Dc in next st, before completing the dc, with the last 2 lps on hook, insert hook into corner of strap, yo and pull through all 3 lps.
Curve of Bone:
With front of bag (the 24 sts) facing you, from the top left corner, count backwards 5 dc, and start from there.
Rnd 1:
ch-1, hdc in next, dc in next 3 sts, 3 dc in corner, work 2 dc evenly on the side post of dc in Row 1 (where marker is) *Side note, work 2 dc in post of Row 2, work 1 dc in between row, work 2 dc in post of Row 3, work 1 dc in between row, work 1 hdc in post of Row 4, sc in post of Row 5. Ch-1. Turn.
 |
| The in-between Row marked in circles. |
*Side Note:
When you're working with the starting of row (when working the bag), the ch-2 will be easy to see, but when working the other 3 side edges, it won't be as easy to detect the "20th" or "24th" dc. That's when the marker comes in handy.
Rnd 2:
Hdc in next st, (dc in next st, 2 dc in next st) 4x, dc in next st, 3 dc in next st, dc in next st, 2 dc in next st, dc in next st, sk 1 st, sc in next st. Ch-1. Turn.
Rnd 3:
Sk 1 st, sc in next 19 sts, sl st in next 2 sts, sl st in post of Row 5, hdc in post of Row 6, work 2 dc in post of Row 7, work 1 dc in between row, work 2 dc in post on Row 8, work 1 dc in between row, work 2 dc in post of Row 9, 3 dc in next st, dc in next 3 sts, hdc in next st, sl st in next st, ch-2. Turn.
Rnd 4:
Sk 1 st, hdc in next st, dc in next st, 2 dc in next st, dc in next st, 3 dc in next st, dc in next st, (2 dc in next st, dc in next st) 3x, hdc in next st, sc in next st, sl st in next, ch-1. Turn.
Rnd 5:
Sk 1 st, sc 18, sl st in next 2 st, sl st to bag^. Sl st over to the other side until it's 5 dc away from the corner, and repeat Rnd 1 - Rnd 5 but stop at ^ and fasten off.
Repeat Curve of Bone for the other front side of the bag.
4 comments:
I own a spaniel, so I must make this! Bone bag would be wonderful for storing his toys. :)
you are very talented.
So cute! I can recommend Lily Chin's little book "Crochet Tips & Tricks" for ways to avoid sewing seams and weaving in ends. Full of things that made me go "Aha!!".
Thank you for sharing, Carolin. I'll look into that.
Post a Comment