I've counted! Today, I had to retrieve the hand-towel from the floor 33 times after the kids went in to wash their hands! So, short of tying a hand towel to their shirt (which I did threatened, and got a response of: "can you make mine a bunny shape, then I can use the ears to tie to my shirt!!"), I decided to make more (no not bunny shape, although that did spark my interest ;] )as the 1st one had been on the towel ring since I put it on! Woohoo!

 |
| Hang on towel ring |
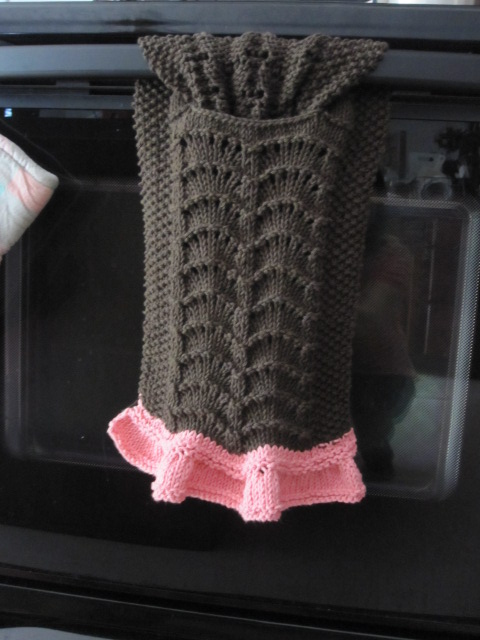 |
| Or hang on oven door handle |
Stitches Used/Abbreviation:
Cable CO: insert right needle in between 2 stitches, wrap yarn as if to knit, pull up a loop, and put the loop on left needle. Video instruction here. Since there's already stitches on left needle, skip the slip knot and first 2 sts, observe when she CO the 3rd st. This is what is needed for the pattern below.
St St : RS - knit, WS - purl (this will count as 1 st st row)
Garter st: knit on both RS and WS. (this will count as 1 garter st row)
byf: bring yarn forward to front of needle
byb: bring yarn to back of needle
byb: bring yarn to back of needle
psso: pass slip stitch over
k2tog: knit 2 together
pm - place marker
sm - slip marker
Border: (k, p) 3x, k1
sm - slip marker
Border: (k, p) 3x, k1
Notes:
When you see "garter st for 2 rows" in pattern instructions, you would knit on both RS & WS, and this 2 row would count as ONE garter st row.
When you see byf, bring the yarn forward, keep the yarn in front of needle, then knit the following stitch.
When you see byf, bring the yarn forward, keep the yarn in front of needle, then knit the following stitch.
Needles: 5.0 mm /US 8
Yarn: Bernat Handicrafter in Country Pink & Dark Brown
Ruffles:
CO 84 in Country Pink
St st for 4 rows (or till your st st measure 1", ending on the WS)
(RS) k2tog to the end (42 sts)
Garter st for 2 rows
P the next row
Pattern Stitch:
Attach new yarn
1) Border, pm, k1, [sl 1, k1, psso, k9, k2tog]; repeat [ ] 1 more time, k1, pm, Border.
2) & 4) Border, sm, p to marker, sm, Border
3) Border, sm, k1, [sl 1, k1, psso, k7, k2tog]; repeat [ ] 1 more time, k1, sm, Border.
5) Border, sm, k1, [sl 1, k1, psso, byf, (k1, byf)5x, k2tog]; repeat [ ] 1 more time, k1, sm, Border.
6) Border, sm, k to marker, sm, Border
Repeat Pattern Stitch 9 times, ending with row 6)
Note: If you don't want the slit, skip the following section, and proceed straight to the After Slit section.
Border, St st for 4 rows, Border.
Slit Opening:
(RS) Border, k5, byf, sl next st purlwise, byb, *sl next st, psso; repeat from * till there's 4 sts left before marker.
Sl the last bo st back on the right needle to the left needle. (you now have 5 sts before marker on left needle)
Turn work (WS), byb, CO 21 sts using cable CO
Turn work (RS), byb, sl the next st on left needle to right needle, pass 1 st of the CO (on right needle) over.
k1, k2tog, k1, Border. (42 sts)
(WS) k to end
St st for 2 rows.
Garter St for 1 row.
After Slit:
Continue working Pattern Stitch section for 9 times, ending with row 6).
Garter st for 1 row.
BO
Loop towel through the slit opening onto towel ring.
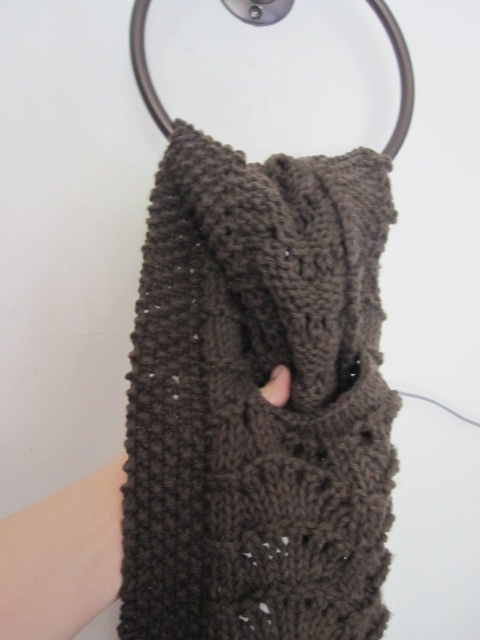 |
| Then pull the top through slit. |
 |
| With RS facing and ruffles on bottom, put towel through the towel ring. |
4 comments:
Thank you for sharing this... this will be solving a problem at my house. My husband likes to tie dishtowels to the cabinet hardware (so they don't run away). I despise this and can't get them untied, due to arthritis.
thank you so much!
Hi - I'm trying to make this, but I keep ending up with too few stitches when I finish the pattern. I start out with 42, but end up with 40 after row 6. Any ideas what I am doing wrong? I tried the byf row a few times to see if I wasn't catching up there, but no luck. I lose four sts each on rows 1 and 3, and then don't make up enough... Help!
It's a beautiful little pattern and I'm making one for a teacher gift. Thanks for publishing, and any suggestions you have!
busgirl on ravelry
Hi busgirl,
When you finished the 6 rows of pattern stitch, do you have a total of 6 eyelets on the top of the "fan"? If not, then I'm guessing you might have missed a byf. I'll pm you on Ravelry shortly. If you have a photo of your WIP, I might be able to help further.
Nope! I've only got five eyelets! Maybe I just need to add a YO someplace to make it come out right.
Thank you for the clarification! I'll try to post a pic of my WIP, but I am notoriously slow at that.
Thanks again for the sweet pattern!
busgirl
Post a Comment