
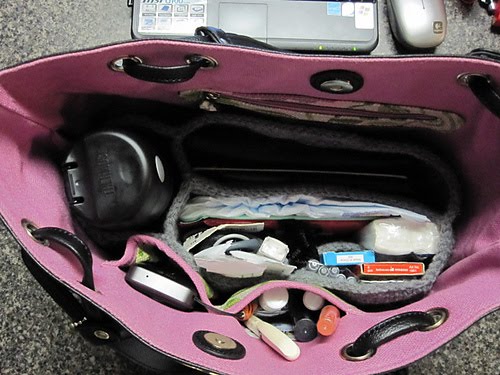
7/14 - Just got my Spartina 449 Day Tote bag today! LOVE the bag, but unfortunately it lacks compartment! So gonna crochet one!
This is more a method than a pattern. It has a lot of possibilities, very customizable to the way you want it. I did write up the pattern for my insert further down the page, but I encourage you to try to customize it to your bag size, right down to how many pockets you want, and which side you want it at - inside (like mine) or on the outside. :) All this is done without sewing. Don't let this lengthy guide dissuade you. It really isn't difficult. Once you get a hang of it, it's can really cut down the time of having to work a separate piece and then sew to attached to your main piece.
I made a video while crocheting this insert, but since this my first attempt in making videos of my work, it didn't turn out too well. As you will see, I didn't zoom in enough for you to see what I was doing clearly. So I've included a hand drawn diagram, and hopefully these will help you get going.
Notes:
PU - pick up.
This is a knitting term to pull up new stitches along one or more edges of a piece of knitting. I use this term here when outlining dividers and pockets.
So when you see PU, it means: insert hook in starting position, and out on the next position (don't necessary be a stitch, it can be in between stitches), yo, pull up a loop.
 |
| Diagram 1 |
Base:
Starting chain will be the length of your insert. Chain to the length that would fit into your bag length-wise. Refer to Diagram 1.
Rnd 1
Hdc row will be the width of your insert. Hdc 3rd ch from hook, and in each ch till the last chain. Turn
Rnd 2
Ch 2, hdc in 1st st, and in each st till the end. Turn. Repeat this until you get the width of your bag. Refer to Diagram 1.
 |
| Diagram 2 |
Side:
When you reach the width you desire, do not turn. Cont. to work in rounds using sc, adding 3 sc in each corner of the base. Diagram 2.
 |
| Diagram 3 |
Rnd 1:
3sc in next st, sc down the side of base, 3 sc in corner, sc along lower baseline, 3 sc in corner, sc up the side of base, 3 sc in corner, sc along upper baseline, join with sl st to 1st sc made. Diagram 3.
Rnd 2:
Ch 1, for this round only, work sc in back lp all around, join to ch 1.
Rnd 3:
Ch 2, hdc all around, join to top of ch 2. Repeat this row until desired height. Fasten off.
Divider:
Starting
 |
| Diagram 4 |
Turn insert inside out. Join yarn at starting point (Diagram 4) of where your divider will be. {Insert hook in and out, yo and pull up a lp} --> this is PU, {yo and pull through 2 lps} -->; this is sc. Here's a badly made PU & sc video ;) Insert hook in place where you just made your sc, and out on the next st, yo and pull up a lp, and sc. Cont. to PU and sc to outline the base of your divider. Keep count of how many sc made. Keep this number of stitches as you work up your divider with hdc. The number of hdc should be the same as your outlined sc.
Join to wall
When you reach the end of the base, you would want to join with PU and sl st to the wall of the insert. Click at your own risk of eye-ache: another not-so-clear joining video clip. ;)
PU on the wall, keep it real tight, and sl st. Repeat 1 more PU and sl st. Turn.
Building up divider
Rnd 1
Skip the 2 sl st, hdc in sc and hdc in all sc outlined. Keep count! Proceed to [PU and sl st] twice to wall (Last video PU and sl st, I promised!). Turn.
Rnd 2
Skip the 2 sl st, hdc next stitch and all the way to the last hdc. Keep count. [PU and sl st] twice to wall. Turn. Repeat this rnd till divider is same height with your insert. Fasten off.
Pockets:
 |
| Diagram 5 |
Outline your pocket on the insert by using the PU and sc method. Once you've outlined the pocket, sc in each outlined sc toward the lower baseline. Diagram 5.
Rnd 1
Hdc on the base (Diagram 5), PU and sl st to the outlined sc on side, PU and sl st to next sc. Turn. Skip the 2 sl sts, hdc in 1st hdc and all hdc. (Keep count of hdc. The number of hdc should be the same as the outlined sc on the base pocket). PU and sl st to the sc on side, PU and sl st to next sc. Turn. Repeat this rnd till pocket is complete.
Finishing off:
Once you've add in all your desired dividers and pockets, sl st all around top edge to give it a sturdier hold.
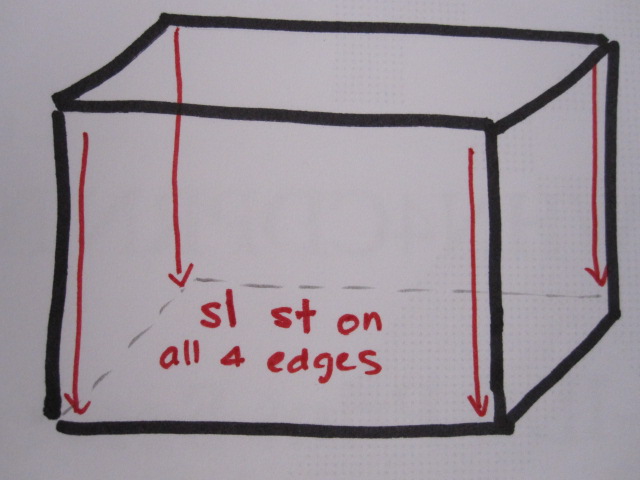 |
| Diagram 6 |
Sl st on the outside, the edge line down of all corner (Diagram 6). This create a crease and would define the shape of your insert.
Hook: G (4.0 mm)
Yarn: Bernat Super Value in True Grey
Yarn suggestions: Red Heart Super Saver, any medium worsted yarn.
Finished object measurements: 10" L x 4"W x 5" H
Ch 43
Rnd 1:
Hdc in 3rd ch from hook. Hdc in all ch, (40 sts). Turn
Rnd 2
Ch 2, hdc in 1st st and the next 39 sts. Turn. Repeat 14x. Do not turn.
From here on, do not turn. Pattern will be worked in the round.
Side:
Rnd 1
3 sc in next st, work 10 sc along the side edge, 3 sc in corner, sc in the next 39 hdc, 3 sc in last hdc, work 10 sc along the other side edge, 3 sc in corner, sc in the next 39 hdc. Join to top of ch 2.
Rnd 2:
Ch 1, for this round only, work sc in back lp. Sc in all the sc of previous row, join to ch 1.
Rnd 3:
Ch 2, hdc around in all sts of previous row, join to top of ch 2. Repeat this row 15x. Fasten off.
Vertical Divider:
Rnd 1:
Turn insert inside out. Count 10 sts from the right, on the upper baseline. Join yarn, PU and work 14 sc across base piece. When reach the wall (you'll be able to see the line where the sc was worked in back lp), PU and sl st to wall twice. Turn.
Rnd 2:
Skip the 2 sl st, hdc in sc, work hdc in the next 13 sc (14 sts). Join to wall with PU and sl st, twice. Turn.
Rnd 3:
Skip the 2 sl st, hdc in 1st st, hdc to the end (14 sts). PU and sl st, twice. Turn. Repeat 15x. Turn. Sl st in 1st hdc, sl st in the next 13 hdc, sl st to wall of insert. Fasten off.
Horizontal Divider:
Rnd 1:
Turn your insert so that your vertical divider is now on your left. From the upper baseline, count 8 rows of hdc, join yarn on the end of 8th row. PU and work 30 sc horizontally across towards your vertical divider. PU and sl st to wall of vertical divider twice. Turn.
Rnd 2:
Skip the 2 sl st, hdc in sc, work hdc in the next 29 sc (30 sts). Join to side wall with PU and sl st, twice. Turn.
Rnd 3:
Skip the 2 sl st, hdc in 1st st, hdc to the end (30 sts). PU and sl st, twice. Turn. Repeat 15x. Turn. Sl st in 1st hdc, sl st in the next 39 hdc, sl st to wall of insert. Fasten off.
Pocket 1:
Keep your work turned inside out. When you work your outline for the pocket, you insert will be turned sideways (horizontal divider will be vertical, and vertical divider will now be horizontal). Count 10 rows from bottom baseline, join yarn on the 10th row about 0.5" away from the side wall of insert. PU and work 11 sc down towards the bottom baseline of insert. PU and work 16 sc across bottom baseline, and PU and work 11 sc up towards upper baseline. Turn work 180 degrees, work 11 sc towards lower baseline. Turn work 90 degrees.
Rnd 1:
Hdc in the next 16 sts, on the base (Diagram 5), PU and sl st to the outlined sc on side, PU and sl st to next sc. Turn.
Rnd 2:
Skip the 2 sl sts, hdc in 1st hdc and hdc in 15 sts. PU and sl st to the sc on side, PU and sl st to next sc. Turn. Repeat this rnd 11x. Sl st in 1st hdc, sl st in the next 15 hdc, sl st to wall of insert. Fasten off.
Pocket 2:
Keep your work turned inside out. When you work your outline for the pocket, you insert will be turned sideways (horizontal divider will be vertical, and vertical divider will now be horizontal). Count 10 rows from bottom baseline, join yarn on the 10th row about 0.5" away from Pocket 1. PU and work 11 sc down towards the bottom baseline of insert. PU and work 10 sc across bottom baseline, and PU and work 11 sc up towards upper baseline. Turn work 180 degrees, work 11 sc towards lower baseline. Turn work 90 degrees.
Rnd 1:
Hdc in the next 10 sts, on the base (Diagram 5), PU and sl st to the outlined sc on side, PU and sl st to next outlined sc. Turn.
Rnd 2:
Skip the 2 sl sts, hdc in 1st hdc and hdc in 9 sts. PU and sl st to the sc on side, PU and sl st to next sc. Turn. Repeat this rnd 11x. Sl st in 1st hdc, sl st in the next 9 hdc, sl st to wall of insert. Fasten off.
Finishing off:
Turn your work right side out. Sl st all around top edge and sl st down each edge on the insert (Diagram 6). Fasten off.
No comments:
Post a Comment